你需要什麼
要完成本教程,您需要以下內容。
- 為Live API設置的帳戶
- Live API的api密鑰(設置帳戶時提供給您)
- Video Cloud帳戶(創建實時流作業不是必需的,但需要在Brightcove Player中設置播放)
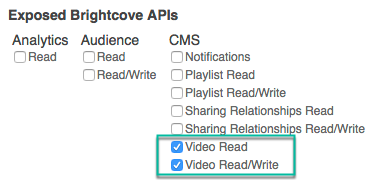
- 如果您將使用CMS API要創建Video Cloud視頻而不是Studio,您需要具有視頻/讀取和視頻/寫入權限的客戶端憑據-如果您不熟悉獲取客戶端憑據的過程,請參閱認證方式下面的部分。
- 可以通過以下方式發出REST API請求捲曲或REST客戶端(例如失眠要么郵差。
為了幫助您,我們準備了一些可用於練習的失眠症和Postman進口品(在Brightcove Learning Services,我們更喜歡並使用Insomnia,但如果您擁有的話,Postman也可以使用):
在每個zip文件中,您都會找到一個自述頁面來幫助您。
- 要創建實際的實時流,您將需要用於實時流的軟件或硬件編碼器。下面的說明將介紹使用Wirecast設置直播的步驟(註冊試用)。如果您使用其他編碼器,則過程將有所不同,但就Live API響應所需的信息而言,過程應相似。
取得 CMS API 的認證
建立即時工作
首先,我們將創建現場作業。
- 對於此步驟,您將提交一個
POST請求:https://api.bcovlive.io/v1/jobs使用以下內容作為請求正文:
{ "live_stream": true, "region": "us-west-2", "reconnect_time": 1800, "outputs": [ { "label": "hls720p", "live_stream": true, "width": 1280, "height": 720, "video_codec": "h264", "h264_profile": "high", "video_bitrate": 2100, "segment_seconds": 4, "keyframe_interval": 60 }, { "label": "hls540p", "live_stream": true, "width": 960, "height": 540, "video_codec": "h264", "h264_profile": "main", "video_bitrate": 1500, "segment_seconds": 4, "keyframe_interval": 60 }, { "label": "hls360p", "live_stream": true, "width": 640, "height": 360, "video_codec": "h264", "h264_profile": "main", "video_bitrate": 800, "segment_seconds": 4, "keyframe_interval": 60 } ] } - 如果您使用的是REST客戶端,例如失眠要么郵差,您將需要為請求添加以下標頭:
金鑰 價格 X API密鑰 您的API密鑰 內容類型 應用程式/json 使用上面步驟1中顯示的請求正文,並確保使用POST方法發送請求。
- API的響應應類似於以下內容:
範例回應
{ "id": "15981d93877e490185e6ebc9af2c79a3", "outputs": [ { "id": "0-15981d93877e490185e6ebc9af2c79a3", "playback_url": "https://bcovlive-a.akamaihd.net/15981d93877e490185e6ebc9af2c79a3/us-west-2/profile_0/chunklist.m3u8", "playback_url_dvr": "https://bcovlive-a.akamaihd.net/15981d93877e490185e6ebc9af2c79a3/us-west-2/profile_0/chunklist_dvr.m3u8", "playback_url_vod": "https://bcovlive-a.akamaihd.net/15981d93877e490185e6ebc9af2c79a3/us-west-2/profile_0/chunklist_vod.m3u8", "label": "hls720p" }, { "id": "1-15981d93877e490185e6ebc9af2c79a3", "playback_url": "https://bcovlive-a.akamaihd.net/15981d93877e490185e6ebc9af2c79a3/us-west-2/profile_1/chunklist.m3u8", "playback_url_dvr": "https://bcovlive-a.akamaihd.net/15981d93877e490185e6ebc9af2c79a3/us-west-2/profile_1/chunklist_dvr.m3u8", "playback_url_vod": "https://bcovlive-a.akamaihd.net/15981d93877e490185e6ebc9af2c79a3/us-west-2/profile_1/chunklist_vod.m3u8", "label": "hls540p" }, { "id": "2-15981d93877e490185e6ebc9af2c79a3", "playback_url": "https://bcovlive-a.akamaihd.net/15981d93877e490185e6ebc9af2c79a3/us-west-2/profile_2/chunklist.m3u8", "playback_url_dvr": "https://bcovlive-a.akamaihd.net/15981d93877e490185e6ebc9af2c79a3/us-west-2/profile_2/chunklist_dvr.m3u8", "playback_url_vod": "https://bcovlive-a.akamaihd.net/15981d93877e490185e6ebc9af2c79a3/us-west-2/profile_2/chunklist_vod.m3u8", "label": "hls360p" }, { "id": "3-15981d93877e490185e6ebc9af2c79a3", "playlist_type": "defaultS3", "type": "playlist", "filename": "playlist.m3u8", "dvr_filename": "playlist_dvr.m3u8", "playback_url": "https://bcovlive-a.akamaihd.net/15981d93877e490185e6ebc9af2c79a3/us-west-2/playlist.m3u8", "playback_url_dvr": "https://bcovlive-a.akamaihd.net/15981d93877e490185e6ebc9af2c79a3/us-west-2/playlist_dvr.m3u8", "ssai_playback_urls": { "685b239f582c42fca49da33be4f2328e": { "playback_url": "https://bcovlive-a.akamaihd.net/15981d93877e490185e6ebc9af2c79a3/us-west-2/685b239f582c42fca49da33be4f2328e/playlist_ssaiM.m3u8", "playback_url_dvr": "https://bcovlive-a.akamaihd.net/15981d93877e490185e6ebc9af2c79a3/us-west-2/685b239f582c42fca49da33be4f2328e/playlist_dvr_ssaiM.m3u8", "playback_added_cdns": [], "description": "House Ads - a95ac581551b4478b27910e5675db1f8", "type": "ads" }, "c96e2d00d6744c65a3eddb15425e4a51": { "playback_url": "https://bcovlive-a.akamaihd.net/15981d93877e490185e6ebc9af2c79a3/us-west-2/counter/playlist_ssaiM.m3u8", "playback_url_dvr": "https://bcovlive-a.akamaihd.net/15981d93877e490185e6ebc9af2c79a3/us-west-2/counter/playlist_dvr_ssaiM.m3u8", "playback_added_cdns": [], "description": "House Counter - a95ac581551b4478b27910e5675db1f8", "type": "counter" } } } ], "stream_url": "rtmp://ep1-apse2.bcovlive.io:1935/15981d93877e490185e6ebc9af2c79a3", "stream_name": "alive", "encryption": {}, "playback_url": "https://bcovlive-a.akamaihd.net/15981d93877e490185e6ebc9af2c79a3/us-west-2/playlist.m3u8", "playback_url_dvr": "https://bcovlive-a.akamaihd.net/15981d93877e490185e6ebc9af2c79a3/us-west-2/playlist_dvr.m3u8", "ssai_playback_urls": { "685b239f582c42fca49da33be4f2328e": { "playback_url": "https://bcovlive-a.akamaihd.net/15981d93877e490185e6ebc9af2c79a3/us-west-2/685b239f582c42fca49da33be4f2328e/playlist_ssaiM.m3u8", "playback_url_dvr": "https://bcovlive-a.akamaihd.net/15981d93877e490185e6ebc9af2c79a3/us-west-2/685b239f582c42fca49da33be4f2328e/playlist_dvr_ssaiM.m3u8", "playback_added_cdns": [], "description": "House Ads - a95ac581551b4478b27910e5675db1f8", "type": "ads" }, "c96e2d00d6744c65a3eddb15425e4a51": { "playback_url": "https://bcovlive-a.akamaihd.net/15981d93877e490185e6ebc9af2c79a3/us-west-2/counter/playlist_ssaiM.m3u8", "playback_url_dvr": "https://bcovlive-a.akamaihd.net/15981d93877e490185e6ebc9af2c79a3/us-west-2/counter/playlist_dvr_ssaiM.m3u8", "playback_added_cdns": [], "description": "House Counter - a95ac581551b4478b27910e5675db1f8", "type": "counter" } } } - 就我們的目的而言,響應中的重要字段是:
- stream_url(第51行)
- stream_name(第52行)
- 播放網址(第54行)
在接下來的步驟中,您將需要這些字段的值-來自您自己的響應。
設置視頻雲視頻
現在我們有了實時流信息,我們將在Video Cloud中設置一個遠程視頻,以便我們可以在Brightcove Player中播放它。
如果您使用的是Insomnia或Postman,則需要使用客戶端憑據設置OAuth2身份驗證。如果需要幫助,請參閱以下指南之一:
-
首先,您需要通過製作一個新視頻
POST請求:https://cms.api.brightcove.com/v1/accounts/account_id/videos -
請求主體可以包含幾段元數據(請參閱API參考(有關詳細信息),但唯一需要的是
name:{ "name": "some name for your live stream" } -
響應將包含所有視頻元數據,但重要的字段是
id,您將需要添加遠程資產。 -
要添加HLS流,您將創建另一個
POST請求:https://cms.api.brightcove.com/v1/accounts/account_id/videos/video_id/assets/hls_manifest -
這次,請求正文將為:
{
    "remote_url": "playback_url for your live stream"
}
將視頻添加到播放器
現在,我們將創建一個簡單的HTML頁面,並向其中添加播放器以及剛剛創建的視頻。
- 創建一個簡單的HTML頁面以測試實時流播放器。您可以包含任何您喜歡的其他內容,也可以完全不包含任何內容。
- 在Studio媒體模塊中,選擇在先前步驟中創建的視頻,然後單擊發布和嵌入> Web Player:
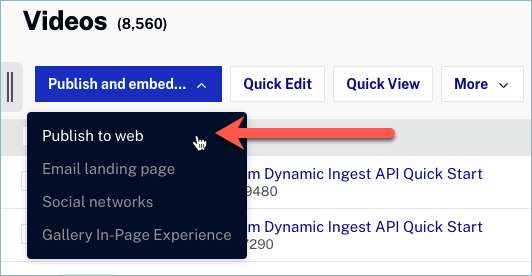
發布影片 - 在“發布”對話框中,選擇一個播放器(Brightcove默認播放器很好):

選擇播放程式 - 向下滾動,根據需要設置播放器的大小,然後在代碼塊中單擊以選擇“標準播放器”代碼-複製此代碼並粘貼到html頁面的正文中:
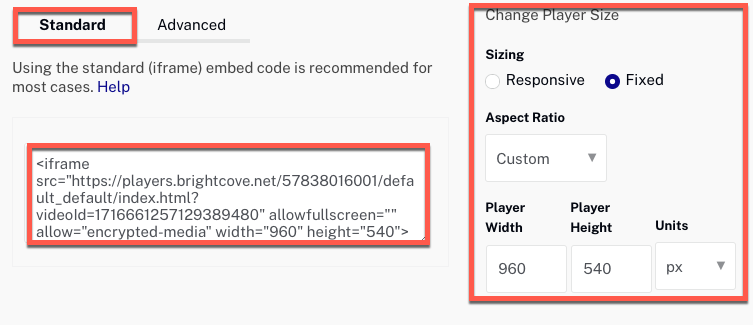
取得發佈程式碼 - 將html頁面保存到遠程或本地Web服務器,以便您可以瀏覽它。
- 在網絡瀏覽器中打開頁面。由於我們尚未開始蒸煮,因此您會看到媒體錯誤:
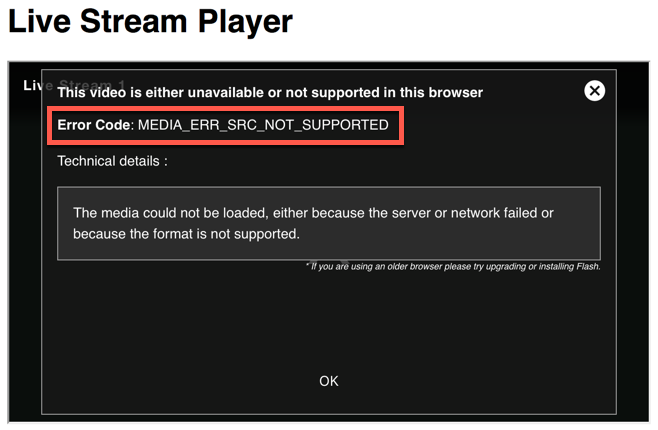
媒體錯誤
cURL命令
本節為那些不使用REST客戶端(例如Insomnia或Postman)的用戶提供了替代的cURL命令。
用於創建現場作業的cURL
## Create Job - Simple
	curl -X "POST" "https://api.bcovlive.io/v1/jobs" \
	-H "X-API-KEY: YOUR_API_KEY_HERE" \
	-H "Content-Type: application/json" \
	-d $'{
	"outputs": [
	{
	"height": 720,
	"video_bitrate": 2100,
	"segment_seconds": 4,
	"keyframe_interval": 60,
	"width": 1280,
	"video_codec": "h264",
	"label": "hls720p",
	"h264_profile": "high",
	"live_stream": true
	},
	{
	"height": 540,
	"video_bitrate": 1500,
	"segment_seconds": 4,
	"keyframe_interval": 60,
	"width": 960,
	"video_codec": "h264",
	"label": "hls540p",
	"h264_profile": "main",
	"live_stream": true
	},
	{
	"height": 360,
	"video_bitrate": 800,
	"segment_seconds": 4,
	"keyframe_interval": 60,
	"width": 640,
	"video_codec": "h264",
	"label": "hls360p",
	"h264_profile": "main",
	"live_stream": true
	}
	],
	"region": "us-west-2",
	"reconnect_time": 1800,
	"live_stream": true
}'將代碼複製到文本編輯器中,然後替換YOUR_API_KEY_HERE 使用您自己的 api 密鑰。然後,將代碼複製並粘貼到命令行並運行。
使用Studio創建視頻
以下是在Studio中創建視頻的替代步驟。
- 登錄到Video Cloud Studio。
- 轉到媒體模塊。
- 在左側的選項中,單擊添加遠程視頻:
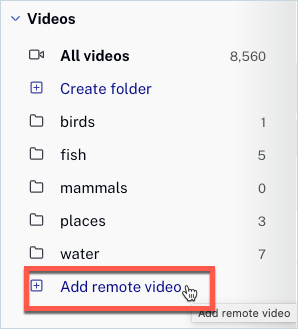
新增遠端視訊選單項目 - 在裡面添加遠程視頻對話框中,添加視頻名稱,然後復制並粘貼
playback_url從實時API響應進入URL字段。然後點擊添加渲染和保存: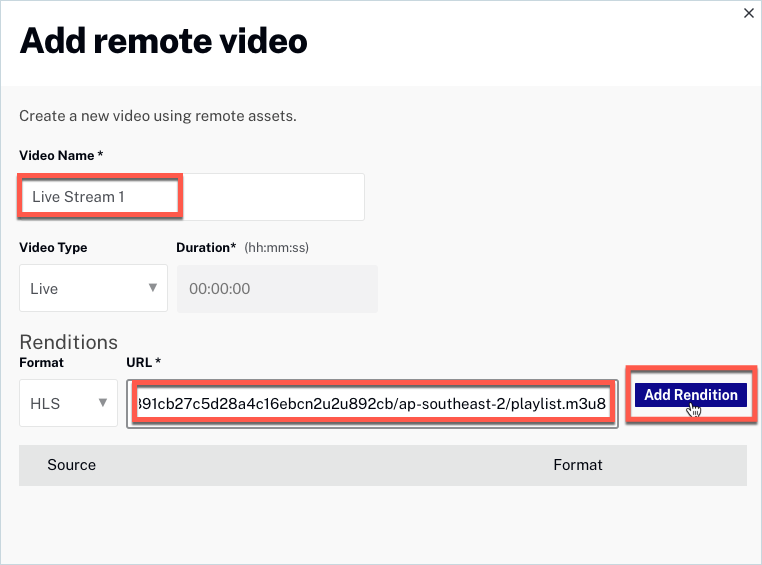
新增節目對話方塊
使用有線廣播流式傳輸事件
在本節中,我們將設定並使用 Telestream Wirecast 編碼器來支援即時串流事件。Telestream Wirecast 軟體是一個桌面應用程式,可以從您的相機擷取輸入,並產生可以由 CDN 傳遞的資料流。請注意,有些硬體和其他軟體的編碼解決方案可能更適合用來傳遞您的直播活動。您可以從以下網站下載Wirecast軟件的試用版: Telestream網站。
注意:繼續進行之前,您應該安裝 Wirecast 軟體,並將相機連接至您的電腦。
若要設定 Wirecast 的即時事件,請依照下列步驟執行。
- 開啟「線上轉播」
- 將鼠標懸停在+,點擊捕獲設備然後選擇您的相機。
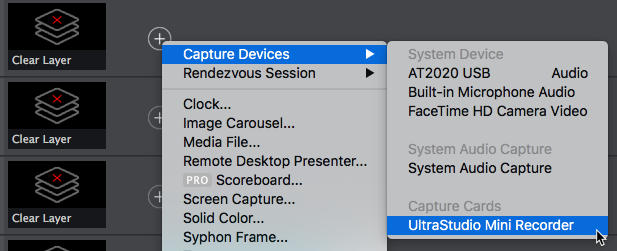
選擇相機 - 點擊箭頭按鈕(
 ),以使相機拍攝到實況鏡頭。
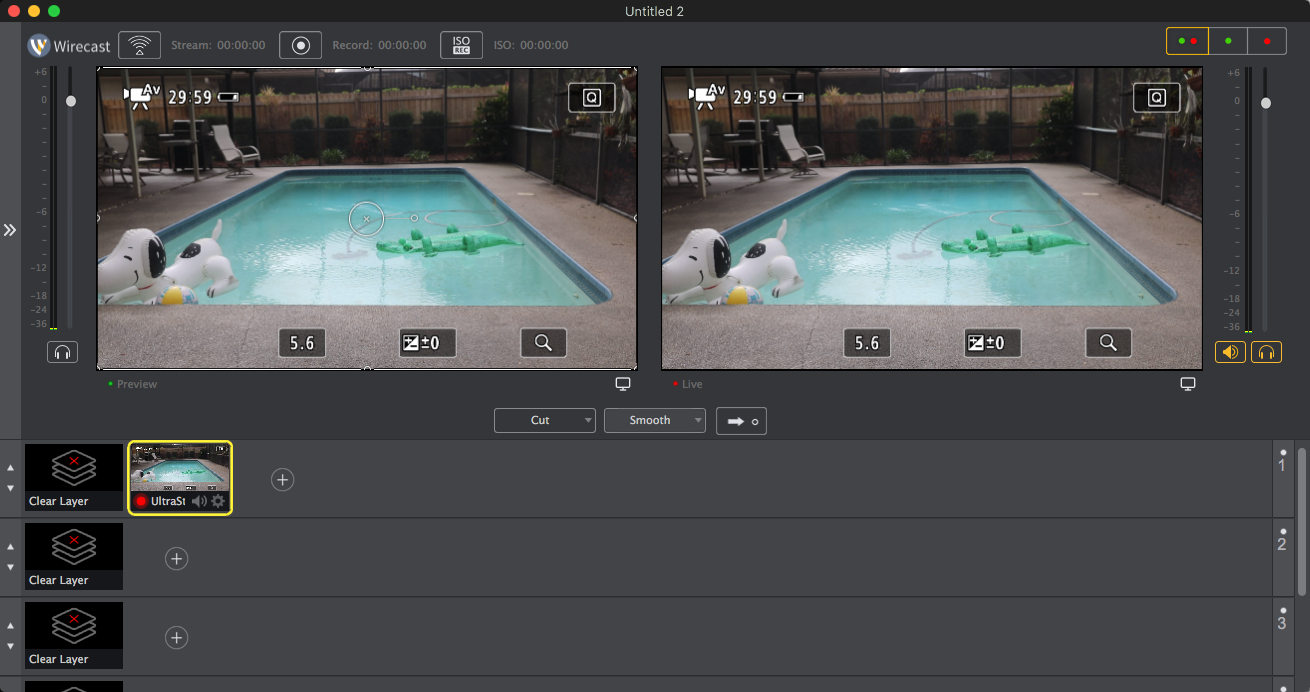
有線攝像機配置 - 按一下「資料流」按鈕 (
 )。系統將提示您配置輸出設置。
 - 將 [ 目的地 ] 設定為 RTMP 伺服器。按一下「確定」。
- 為了地址, 使用stream_url從Live API返回(第3步)。
- 為了流,活著使用。
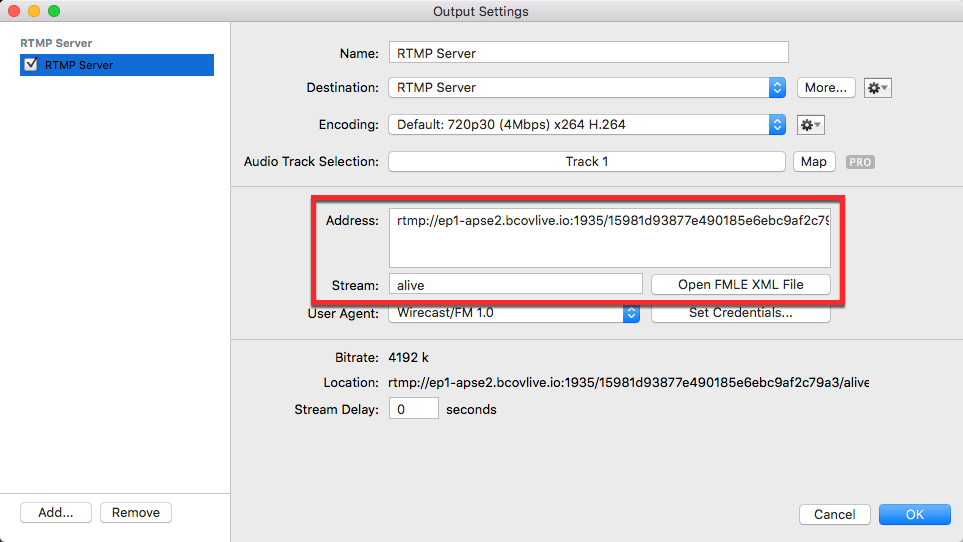
有線廣播輸出設置 - (可選的)要創建其他輸出流,請單擊加...創建其他輸出流時,您可能希望創建自己的自定義編碼配置文件以控制輸出比特率。確保流名稱反映了新的比特率。
- 按一下「確定」以儲存輸出設定。
- 按一下「資料流」按鈕 (
 )。現場直播應該開始。
結論
現在,您可以創建實時流會話了。您需要在編碼器配置中添加以下內容:
stream_url:添加stream_url從你的工作中rtmp地址)stream_name:流名稱必須為alive
啟動實時流後,您應該會看到它出現在前面步驟中創建的Brightcove播放器中。

