XMLHttpRequest()和代理使用 REST API 的高級概述。然後在文檔中稍後深入探討將討論示例代碼。第一個範例使Analytics API用在 Brightcove 播放程式控制列中擷取並顯示目前播放器中視訊的觀看次數。第二個範例則稍微複雜一些,使用與 Brightcove Player 目錄搭配使用,從帳戶擷取最受歡迎的影片,並將其顯示在播放清單中。Analytics API本文件中的程式碼討論將集中於從正確的 REST API 擷取所需的資料。高階視圖
要使用 REST API,您需要有幾個部分。簡單地說,他們是:
- 用戶端代碼:客戶端代碼要求特定的數據,然後根據應用程序要求顯示它。客戶端代碼將在一定的長度在本文件中討論,因為它是您需要最頻繁地編寫的內容。
- 代理伺服器:出於安全原因,REST API 不會直接接受來自客戶端的數據請求,因為這會鼓勵從客戶端發送機密信息,如客戶端憑據。這意味著代理將作為客戶端和 REST API 之間的中介。在示例中使用的代理是用 PHP 編寫的,並在本文件後面討論。代理必須在您控制的服務器上設置,並且可以用您選擇的語言編寫。代理的建議配置使其能夠被寫入一次並由任何 API 使用。
- 其餘的 API:布萊特灣提供一套全方位的 API 來自訂、擴充和與布萊特灣平台整合。查看概述:視頻雲 API文檔以獲取更多信息。
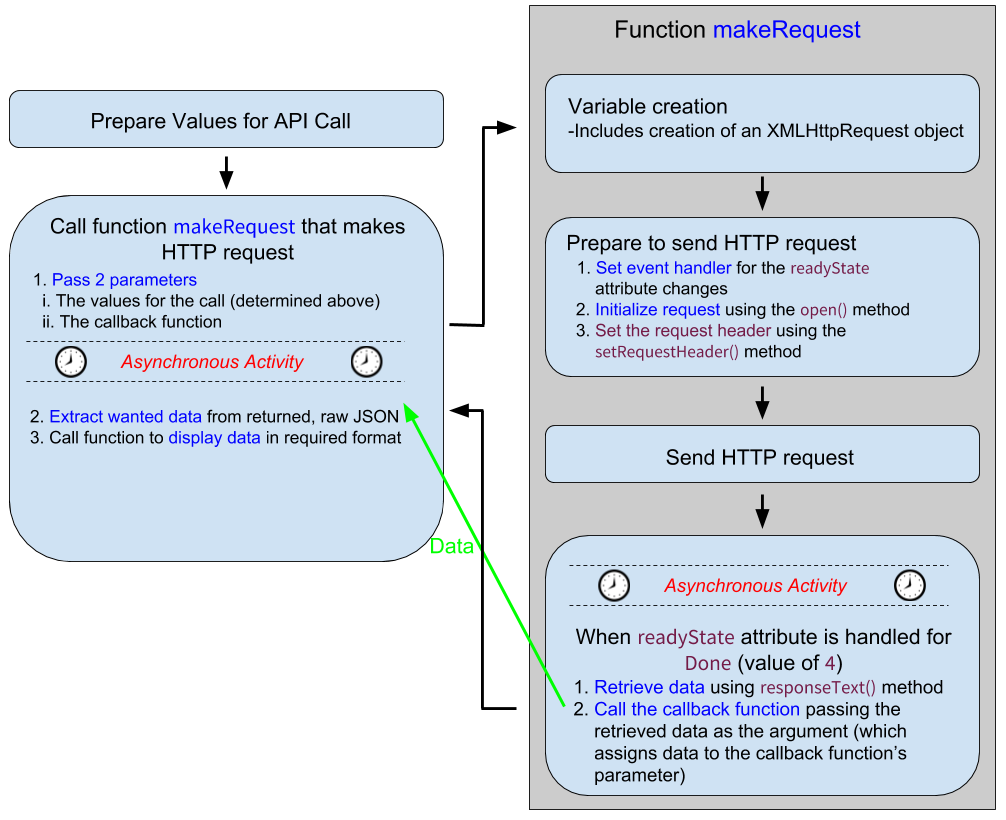
下圖顯示過程的三個核心實體之間的互動,以從 Brightcove 的 REST API 中檢索數據:

用戶端功能概觀
客戶端代碼根據您請求數據的 API 顯著變化。如上所述,代理是寫一次,不修改一段代碼,並且 API 由 Brightcove 維護。這就是為什麼文檔中的重點將是學習如何改變客戶端代碼從其中一個 API 中檢索所需的數據。
下圖著重於客戶端代碼的關鍵部分,那些是:
- 對代理
HTTPRequest進行的函數。為了避免歧義,該函數被命名為makeRequest()。如下圖所示的右側。 - 收集要求所需資訊的程式碼。圖表的左上角如圖所示。這段代碼通常非常簡單,並使用了眾所周知的概念,甚至開始程序員。
- 執行前面提到的
makeRequest()函數的調用。圖表的左下角如圖所示。該調用將函數makeRequest()作為參數傳遞給。然後在makeRequest()該函數被調用。這是一個匿名定義的回調函數的例子。
您會在圖表中看到標示為「非同步活動」的兩個區段。雖然在圖表中表示在兩個不同的地方,但這實際上是相同的異步活動,並表示它需要的未知時間:
- 客戶端發送請求到代理。
- 從 API 請求數據的代理。
- 用於構建結果集並將其返回到代理的 API。
- 代理將數據返回給客戶端。
請注意,調用框中的邏輯流箭頭makeRequest()(左下方框)似乎表明代碼在兩個不同的時間執行,情況正是如此。對函數進行makeRequest()了調用,但是在完成其工作並執行回調函數之前,不會執行回調函數,該函數將請求的數據返回給調用代碼的函數。
範例程式碼逐步解說
而不是將代碼視為一塊,它將在章節中呈現和討論。部分區段將與上圖相關。
標準播放程式碼
此程式碼區段包含基本的 Brightcove 播放程式內嵌程式碼。
- 第十一至二十一號線標準的布萊特灣玩家代碼,添加了一個
id屬性。
<!doctype html>
<html>

<head>
  <meta charset="UTF-8">
  <title>Untitled Document</title>
</head>

<body>

<video-js id="myPlayerID"
  data-video-id="3851380732001"
  data-account="1752604059001"
  data-player="HkAzSmB0l"
  data-embed="default"
  data-application-id
  class="video-js"
  controls
  width="640"
  height="360"></video-js>
<script src="https://players.brightcove.net/1752604059001/HkAzSmB0l_default/index.min.js"></script>
準備撥打電話
此程式碼區段會初始化變數,並準備好進行呼叫makeRequest()。一般來說,對於讀取請求,您需要提供以下資訊:
- 例如,您將使用的代理的 URL(當然,這需要在您的控制下):
https://solutions.brightcove.com/bcls/bcls-proxy/doc-samples-proxy-v2.php - 實際請求所需的 URL,通常動態構建:
https://analytics.api.brightcove.com/v1/alltime/accounts/1752604059001/videos/4825279519001 - 例如,HTTP 方法
GET。
範例如下:
- 第 1 行:標準代碼等待播放器準備好與之互動。
- 第 2-4 行:為稍後在代碼中需要的變量創建/設置值。
- 第 7-12 行:等待
loadstart事件,以便填充mediainfo對象。指派變數以保留Analytics API端點所需的值。 - 第 13 行:設定呼叫的 HTTP 方法。
videojs.getPlayer('myPlayerID').ready(function() {
  var myPlayer = this,
  accountId = myPlayer.bcinfo.accountId,
  options = {};

  // +++ Wait for loadstart event so can use mediainfo object +++
  myPlayer.on('loadstart', function() {
  var videoId = myPlayer.mediainfo.id,
  baseURL = 'https://analytics.api.brightcove.com/v1/alltime/accounts/',
  endPoint = accountId + '/videos/' + videoId;
  options.proxyURL = "https://solutions.brightcove.com/bcls/bcls-proxy/doc-samples-proxy-v2.php";
  options.url = baseURL + endPoint;
options.requestType = "GET";呼叫makeRequest()
此代碼部分使調用makeRequest()函數。請注意,傳遞兩個參數。第一個是保存端點信息的選項對象,第二個是回調函數。請記住,這是一個異步調用,因此在 REST API 將數據返回給函數之前,不會調用匿名定義的回調makeRequest()函數。
- 第 1 行:呼叫
makeRequest()函數,在物件中傳遞呼叫所需的options值。在此情況下,物件包含下列項目:
- 第 3-13 行:回調函數被定義為匿名函數(以黃色突出顯示)。請記住,這個函數是一個參數,不是在這裡調用,但稍後在代碼中調用。
- 第 6、8、10 行:顯示下列項目的
console.log()陳述式:- API 呼叫所傳回的原始 JSON 字串。
- 由做從字符串轉換到對象的
JSON.parse()方法生成的 JSON 對象。 - 實際的意見計數,通過使用簡單的
object.property符號從對象中提取。
- 十二號線調用顯示在控制欄中的視圖數量的功能。
控制台中的以下屏幕截圖顯示了console.log語句中的實際顯示數據:

// +++ Make the request to the Analytics API +++
// Extract views from data returned by Analytics API
makeRequest(options, function(viewsRaw) {
  var viewsCount;
  // Remove console.log command for production code
  console.log('viewsRaw', viewsRaw);
  viewsObject = JSON.parse(viewsRaw);
  console.log('viewsObject', viewsObject);
  viewsCount = viewsObject.alltime_video_views;
  console.log('views', viewsCount);
  // Call function to place data in controlbar
  placeCountInControlbar(viewsCount);
});實際makeRequest()功能
文件的這個區段會檢查實際定義makeRequest()函式的程式碼。定義函數的代碼寫在這樣一種方式,它不需要被修改,但按原樣重複使用。您可能會發現邊緣情況並非如此,但對於絕大多數使用,此代碼不需要修改。
對代碼的逐行討論如下:
- 第 1-6 行:函數定義和變量創建。關鍵點是創建了一個新
XMLHttpRequest對象。 - 第八號線、二十六號線定義變更的事件處理常
readyState式函數。 - 九、二十三、二十五號線:如果請求
try-catch在高級別失敗,請使用 a。 - 十號線、十一號線:使用
if語句來確保請求已完成(readyState4)並成功完成,狀態在 200 範圍內。以下顯示事件處理常式定義中readyState和status值的主控台記錄: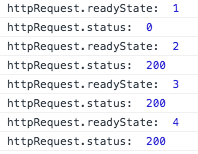
- 第 18 行:回調函數被執行。這會將 API 傳回的資料傳回至回呼函式,如上述呼叫 MakeRequest () 一節所述。
- 第 33 行:設定事件的事件處理常式。
XMLHttpRequest.onreadystatechange - 三十五號線初始化代理的請求。
- 第 38 行:發送請求,這是異步的。
function makeRequest(options, callback) {
  var httpRequest = new XMLHttpRequest(),
  response,
  requestParams,
  dataString,
  proxyURL = options.proxyURL,
  // response handler
  getResponse = function() {
  try {
    if (httpRequest.readyState === 4) {
      if (httpRequest.status >= 200 && httpRequest.status < 300) {
        response = httpRequest.responseText;
        // some API requests return '{null}' for empty responses - breaks JSON.parse
        if (response === '{null}') {
          response = null;
        }
        // return the response
        callback(response);
      } else {
        alert('There was a problem with the request. Request returned ' + httpRequest.status);
      }
    }
  } catch (e) {
    alert('Caught Exception: ' + e);
  }
  };
  /**
  * set up request data
  * the proxy used here takes the following request body:
  * JSON.stringify(options)
  */
  // set response handler
  httpRequest.onreadystatechange = getResponse;
  // open the request
  httpRequest.open('POST', proxyURL);
  // set headers if there is a set header line, remove it
  // open and send request
  httpRequest.send(JSON.stringify(options));
}
顯示傳回的資料
此代碼顯示了如何將返回的數據放入控制欄。這個函數在回調函數的結束時被調用,在調用 MakeRequest()部分上面顯示。
- 第五、十六號線:定義函數。
- 第 6 行:為控制欄中的
spacer元素創建一個變量。 - 第 7 行:動態創建一個
div元素。 - 第 9 行:在新建立的
div元素中放置標示和視圖值。 - 第 11 行:使用 JavaScript 的
document.getElementsByClassName()方法來獲取控制欄的spacer元素。 - 第 13 行:樣式
spacer以顯示總視圖從頂部向右對齊和向下 10pxspacer。 - 第 15 行:將新建立、填入和樣式化的元素加入到
spacer。
/**
* Dynamically build a div that is then
* placed in the controlbar's spacer element
*/
function placeCountInControlbar(viewsCount) {
  var spacer,
  newElement = document.createElement('div');
  //Place data in div
  newElement.innerHTML = "Total Views: " + viewsCount;
  //Get the spacer in the controlbar
  spacer = document.getElementsByClassName('vjs-spacer')[0];
  //Right justify content in the spacer and add top margin
  spacer.setAttribute('style', 'justify-content: flex-end; margin-top: 10px');
  //Add the dynamically built div to the spacer in the controlbar
  spacer.appendChild(newElement);
}
完整的程式碼清單
完整、可運作的程式碼位於此 GitHub 儲存庫中:display-views-in-controlbar.html。
簡單除錯
正如您所看到的,使用 REST API 時涉及許多部分。當應用程式無法正常運作時,這可能會造成挑戰。你從哪裡開始調試?
在本節中提出了幾個簡單的建議,是開始調試冒險的好地方。以下兩節提供了一種方法來查看您需要的最基本信息,通過進行通話時傳入的內容,以及返回的內容。
檢查通話選項
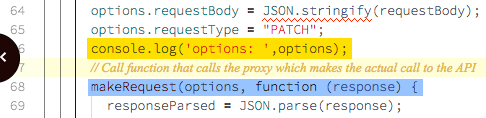
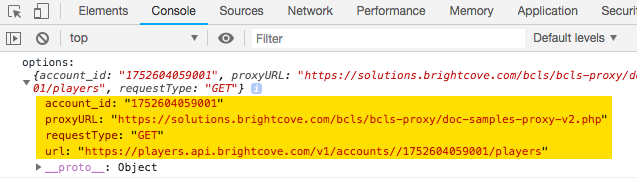
本文件中討論的客戶端代碼基本上是關於提供與代理一起使用的正確選項,以及實際的 API。因此,知道選項是正確的,對於代碼的正確運行至關重要。一個簡單的方法是在將options對象傳遞到使用它們的makeRequest函數之前將對象記錄到控制台:
選項對象包含的內容將根據您想要做的事情而有所不同,但是一些基礎知識將始終存在,那些是:
- 帳號 ID。這可以是個別的屬性,也可以是 API 端點 URL 的一部分。
- 代理的 URL,這將取決於您存儲代理的位置。
- HTTP 方法類型,例如
GET,POST或PATCH。 - 代理用於從 API 發出實際請求的 API 端點 URL。例如:
https://players.api.brightcove.com/v2/accounts/57838016001/players
https://edge.api.brightcove.com/playback/v1/accounts/1752604059001/videos/5842800655001
https://analytics.api.brightcove.com/v1/alltime/accounts/1752604059001/videos/4093643993001
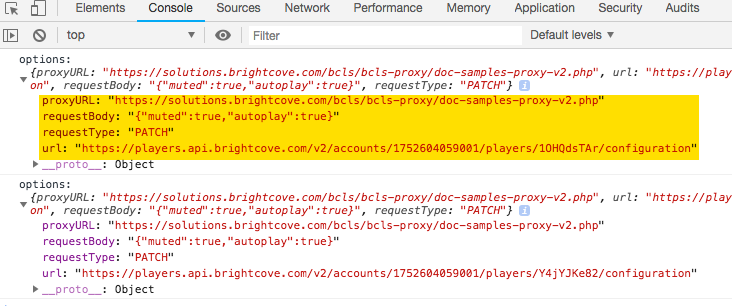
視 API 要求而定,在選項物件中可能需要其他屬性。以下是您在記錄選項對象時在控制台中看到的示例,以便為特定帳戶中的所有玩家提出請求:
以下是更新玩家時使用更複雜的記錄選項對象:
檢視傳回的資料
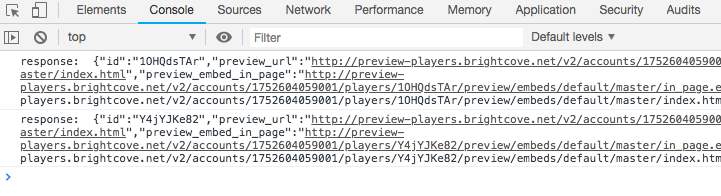
返回的內容將根據您請求的數據以及是否返回錯誤而有所不同。但是,無論返回什麼,您很可能想要查看返回哪些數據。一個簡單的方法是將原始日誌記錄到控制台response調用後的數據makeRequest功能:

將返回的內容幾乎有無限的可能性,但以下是幾個例子。第一個顯示在詢問帳號中的所有玩家時響應的開始:

以下是使用PATCH HTTP 方法更新播放器後的響應:
這是第一個響應中數據的更好格式化的視圖:
{
  "id": "1OHQdsTAr",
  "preview_url": "https://preview-players.brightcove.net/v2/accounts/.../master/index.html",
  "preview_embed_in_page": "https://preview-players.brightcove.net/v2/accounts/.../master/in_page.embed",
  "preview_embed_code": "<iframe src='//preview-players.brightcove.net/v2/accounts/.../master/index.html' ...></iframe>"
  }
最後,這是一個非常有價值的回應,從發生錯誤時。在這種情況下,帳戶正在使用沒有適當的認證:

其他疑難排解秘訣
如果您遇到問題,以下是其他一些需要尋找的事項。
- 沒有回應
- 有幾件事情可以檢查你是否得到一個空的響應:
- 檢查 API 引用以確保請求返回響應。有些只返回沒有內容的 201 或 204 響應(特別是,但不僅僅是 DELETE 請求)。您將需要調整您的代碼來處理這種情況。
- 檢查瀏覽器中開發人員工具的「網絡」部分,以確保您看到成功通話代理(該服務器可能暫時無法使用):
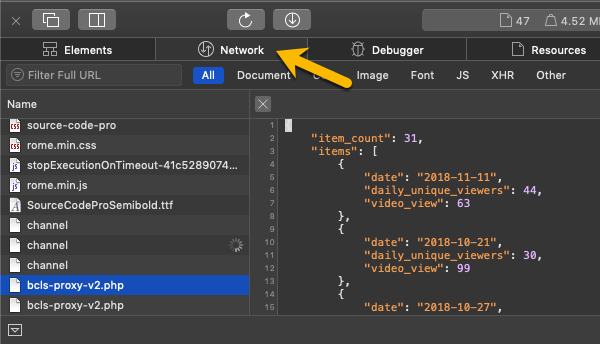
開發人員工具網路部分
- 我看到一個回應,但是當我嘗試
JSON.parse()它時,我得到一個例外。 - 這裡有些可能性:
- 看到上一個項目-試圖解析一個空的刺將拋出一個 JSON 異常
-
查看響應並確保它是一個 JSON 字符串(以
{或 a 開頭[)。在某些情況下,請求可能不會返回 JSON - 一個Analytics API例如,如果您設置format參數到csv或者xlxs.再次,如果您正在提出這些請求,則需要調整代碼以處理非 JSON 響應。 - 在大多數情況下,API 返回的錯誤也是 JSON 格式,但也有一些例外情況,其中錯誤以純文本或 HTML 形式返回。
代理代理代碼
如前所述,代理可以用您選擇的語言編寫。布賴特灣 API 文檔示例使用 PHP 編寫的代理。由於代理的實現是如此依賴於語言,下面的 PHP 代碼將不會在本文件中詳細分析。
代理伺服器提供的基本功能必須包括:
- 接受用戶端要求。
- 得到一個授權令牌來自 OAuth API。
- 將身份驗證令牌和數據請求(端點)發送到預期的 API。
- 從 API 接收數據。
- 將資料傳回給用戶端。
<?php
/**
  * proxy for Brightcove RESTful APIs
  * gets an access token, makes the request, and returns the response
  * Accessing:
  *     (note you should **always** access the proxy via HTTPS)
  *     Method: POST
  *     request body (accessed via php://input) is a JSON object with the following properties
  *
  * {string} url - the URL for the API request
  * {string} [requestType=GET] - HTTP method for the request
  * {string} [requestBody] - JSON data to be sent with write requests
  * {string} [client_id] - OAuth2 client id with sufficient permissions for the request
  * {string} [client_secret] - OAuth2 client secret with sufficient permissions for the request
  *
  * Example:
  * {
  *    "url": "https://cms.api.brightcove.com/v1/accounts/57838016001/video",
  *    "requestType": "PATCH",
  *    "client_id": "0072bebf-0616-442c-84de-7215bb176061",
  *    "client_secret": "7M0vMete8vP_Dmb9oIRdUN1S5lrqTvgtVvdfsasd",
  *    "requestBody": "{\"description\":\"Updated video description\"}"
  * }
  *
  * if client_id and client_secret are not included in the request, default values will be used
  *
  * @returns {string} $response - JSON response received from the API
  */

// security checks
// if you want to do some basic security checks, such as checking the origin of the
// the request against some white list, this would be a good place to do it
// CORS enablement and other headers
header("Access-Control-Allow-Origin: *");
header("Content-type: application/json");
header("X-Content-Type-Options: nosniff");
header("X-XSS-Protection");

// default account values
// if you work on one Brightcove account, put in the values below
// if you do not provide defaults, the client id, and client secret must
// be sent in the request body for each request
$default_client_id     = 'YOUR_CLIENT_ID';
$default_client_secret = 'YOUR_CLIENT_SECRET';

// get request body
$requestData = json_decode(file_get_contents('php://input'));

// set up access token request
// check to see if client id and secret were passed with the request
// and if so, use them instead of defaults
if (isset($requestData->client_id)) {
    $client_id = $requestData->client_id;
}

if (isset($requestData->client_secret)) {
    $client_secret = $requestData->client_secret;
}

$auth_string = "{$client_id}:{$client_secret}";

// make the request to get an access token
$request = "https://oauth.brightcove.com/v4/access_token?grant_type=client_credentials";
$curl = curl_init($request);
curl_setopt($curl, CURLOPT_USERPWD, $auth_string);
curl_setopt($curl, CURLOPT_POST, TRUE);
curl_setopt($curl, CURLOPT_RETURNTRANSFER, TRUE);
curl_setopt($curl, CURLOPT_SSL_VERIFYPEER, FALSE);
curl_setopt($curl, CURLOPT_HTTPHEADER, array(
  'Content-type: application/x-www-form-urlencoded',
));

$response = curl_exec($curl);
$curl_info = curl_getinfo($curl);
$php_log = array(
  "php_error_info" => $curl_info
);
$curl_error = curl_error($curl);

curl_close($curl);

// Check for errors
// it's useful to log as much info as possible for debugging
if ($response === FALSE) {
  log_error($php_log, $curl_error);
}

// Decode the response and get access token
$responseData = json_decode($response, TRUE);
$access_token = $responseData["access_token"];
// get request type or default to GET
$method = "GET";
if ($requestData->requestType) {
    $method = $requestData->requestType;
}

// get the URL and authorization info from the form data
$request = $requestData->url;
// check for a request body sent with the request
if (isset($requestData->requestBody)) {
  $data = $requestData->requestBody;
}
  $curl = curl_init($request);
  curl_setopt($curl, CURLOPT_RETURNTRANSFER, TRUE);
  curl_setopt($curl, CURLOPT_SSL_VERIFYPEER, FALSE);
  curl_setopt($curl, CURLOPT_HTTPHEADER, array(
    'Content-type: application/json',
    "Authorization: Bearer {$access_token}"
  ));
  switch ($method)
    {
      case "POST":
        curl_setopt($curl, CURLOPT_POST, TRUE);
        if ($requestData->requestBody) {
          curl_setopt($curl, CURLOPT_POSTFIELDS, $data);
        }
        break;
      case "PUT":
        // don't use CURLOPT_PUT; it is not reliable
        curl_setopt($curl, CURLOPT_CUSTOMREQUEST, $method);
        if ($requestData->requestBody) {
          curl_setopt($curl, CURLOPT_POSTFIELDS, $data);
        }
        break;
      case "PATCH":
        curl_setopt($curl, CURLOPT_CUSTOMREQUEST, $method);
        if ($requestData->requestBody) {
          curl_setopt($curl, CURLOPT_POSTFIELDS, $data);
        }
        break;
      case "DELETE":
        curl_setopt($curl, CURLOPT_CUSTOMREQUEST, $method);
        if ($requestData->requestBody) {
          curl_setopt($curl, CURLOPT_POSTFIELDS, $data);
        }
        break;
      default:
        // GET request, nothing to do;
    }
  $response = curl_exec($curl);
  $curl_info = curl_getinfo($curl);
  $php_log = array(
    "php_error_info" => $curl_info
  );
  $curl_error = curl_error($curl);
  curl_close($curl);

// Check for errors and log them if any
// note that logging will fail unless
// the file log.txt exists in the same
// directory as the proxy and is writable

if ($response === FALSE) {
  log_error($php_log, $curl_error);
}

function log_error($php_log, $curl_error) {
  $logEntry = "\nError:\n". "\n".date("Y-m-d H:i:s"). " UTC \n" .$curl_error. "\n".json_encode($php_log, JSON_PRETTY_PRINT);
  $logFileLocation = "log.txt";
  $fileHandle      = fopen($logFileLocation, 'a') or die("-1");
  fwrite($fileHandle, $logEntry);
  fclose($fileHandle);
  echo "Error: there was a problem with your API call"+
  die(json_encode($php_log, JSON_PRETTY_PRINT));
}

// return the response to the AJAX caller
echo $response;
?>
雖然上面顯示了代理服務器的完整代碼,但它也位於 GitHub 存儲庫中:示例代理應用程序在裡面PHP文件夾。
範例 2
這第二個例子比前面詳述的更複雜。此範例會顯示播放清單中帳戶中最受歡迎的 10 部影片。代碼的主要步驟是:
- 從帳戶中觀看次數最多的 10 個視頻中請求。Analytics API這一步涉及使用回調函數的異步調用。
- 從返回的Analytics API數據中,僅提取視頻 ID 並將其放置在數組中。一個輔助函數被寫入做從返回的數據提取 ID。
- 請求陣列中 ID 清單中每個視訊的完整視訊物件。此步驟涉及循環遍歷數組並使用請求視頻對象
player.catalog.getVideo()。當然,這涉及使用catalog.一個輔助函數被寫入檢索基於 ID 的視頻對象,並將對象放入一個數組。 - 將視訊物件陣列放入播放清單啟用播放清單的播放清單中。
由於您現在已熟悉有關如何調用 API 的許多概念和特定代碼,因此只有調用該makeRequest()函數的代碼才會詳細說明。
- 第 2 行:將傳遞為參數的
makeRequest()函數呼叫成功 REST API 呼叫所需的選項,以及匿名定義的回呼函數 (以黃色反白顯示)。這聽起來應該從上面看起來很熟悉。非常重要的是,所調用的makeRequest()函數與前面示例中使用的完全相同的函數。你可以在你的代碼中做同樣的事情。該makeRequest()函數的寫入是為了在對 Brightcove REST API 的任何調用中重複使用。 - 第 3 行:創建一個變量來保存 JSON 解析返回的數據。
- 第 5 行:解析返回的數據,如果從字符串轉換為對象。
- 第 7 行:使用輔助函數從返回的數據中提取視頻 ID。不幸的是,Analytics API不會返回完整的視頻對象,因此需要 ID 才能訪問完整對象。
- 第 9-12 行:打電話給
getVideoData使用回調函數填充的輔助函數videoObjects基於傳遞的 ID 的數組。 - 第 11 行:使用視訊物件陣列填入播放清單。
// +++ Make the CMS API request to get matching video IDs +++
makeRequest(options, function(mostWatchedVideos) {
  var JSONmostWatchedVideos;
  // Convert response string into JSON
  JSONmostWatchedVideos = JSON.parse(mostWatchedVideos);
  // Extract the needed video IDs into an array
  videoData = extractVideoData(JSONmostWatchedVideos);
  // Get video objects based on array of video IDs
  getVideoData(videoData, function(videoObjects) {
    // Add the most watched videos list to the player as a playlist
    myPlayer.playlist(videoObjects);
  });
});
完整的程式碼清單
完整、運作的範例位於這個 CodePen:播放清單中最多觀看的影片。